Campus Connection Assistance

North Dakota University System (NDUS) Help Desk

1-866-457-6387
or
Submit a Help Desk Ticket.

Delegated Access to Campus Connection

Delegated access allows you to grant viewable access to certain pages within Campus Connection to a third-party or proxy. You can grant a proxy access to:

  • pay online

and/or view:

  • financial aid
  • student finance (account balance, payment history, and 1098t)
  • contact information (addresses, email, phone number)
  • classes
  • course history
  • grades
  • tasks (to-do lists, holds, etc.)

Directions for students to delegate access to a proxy

Directions for the proxy to access Campus Connection

Additional Instructions

  1. Log in to Campus Connection.
  2. From Student Homepage, click Financial Account then Account Summary.
  3. At the top of the page, confirm that Dickinson State University and the proper Term are selected.
  4. Click Continue.

Statements are not mailed. You are responsible for accessing your financial information on Campus Connection by the payment deadline.

  1. Log in to Campus Connection.
  2. Click Manage Classes then Class Search and Enroll.
  3. Confirm that Dickinson State University and the proper Term are selected and click Continue. (This option may not appear if you’re only eligible to register for one term.)
  4. Enter Class ID# Number (if known), otherwise click Search below to search for a course.
  5. Use the drop-down menu to find Course Subject, enter catalog number if known.
    (Note: To view all available courses in a subject, leave catalog number blank. Use additional search criteria to search by instruction mode, career level, time, instructor, etc.)
  6. The first three classes are shown by default. Click View All Sections in the blue header bar to view all available sections of a class.
  7. Click the link next to the Section label for course details (course fees, prerequisites, course description, general education, course restrictions, etc.).
  8. To select your desired section, click the green Select Class button.
  9. Click Next to add class to your Enrollment Shopping Cart.
    (Note: Classes in your Shopping Cart are only saved search results and are NOT added to your schedule until you complete the following steps.)
  10. Click Proceed to Step 2 of 3 to go to the class confirmation screen.
  11. Confirm class(es) and click Finish Enrolling.
  12. Watch for Success or Error messages:
    • A green check mark means you’ve successfully enrolled in the course.
    • A red X means there was an error that stopped you from adding the class (usually due to time conflicts, or a missing course pre-requisite).
  13. Click Add Another Course to continue adding classes to your schedule.
  14. Click My Class Schedule to review your list of enrolled courses and print a copy if desired.

This will allow someone other than you to be set up to make a payment.

* Authorized users must have an email account. *

  1. Log in to Campus Connection.
  2. From Student Center, click Financial Account then Pay Online Now.
  3. Choose Authorized Users from the menu at the top of the page.
  4. Enter the email address of the user you want to add and answer the two questions in the Add an Authorized User box.
  5. Click Continue.
  6. Click I Agree.

  1. Access the Campus Connection Student Portal (log in is not required).
  2. In the left navigation menu:
    • Click Class Search (if not logged in).
    • Click Class Search/Browse Catalog > Class Search (if logged in).
  3. Select Dickinson State University; choose term, course subject, and course number (if known).
  4. Offered sections will have an availability icon:
    • green circle = Open
    • blue square = Closed
    • orange triangle = Wait List
  5. Click Section: for course details (course fees, prerequisites, course description, course restrictions, etc.).

  1. If you haven’t already done so, Claim your new System ID.
  2. Log in to your NDUS Account (User ID = firstname.lastname format).
  3. Click Change Password.
  4. Enter and confirm your new password.
    • The password must contain between 8 and 16 characters from three of the following four categories:
      • English uppercase characters (A through Z)
      • English lowercase characters (a through z)
      • Numbers (0 through 9)
      • Non-alphanumeric characters ` ~ ! @ # $ % ^ * ( ) _ + – = { } | [ ] \ : ; ? , . /
    • NO spaces are allowed.
    • Passwords cannot contain your name or username.
  5. Click Change Password.

CHANGING YOUR AUTHENTICATION QUESTIONS AND ANSWERS

  1. If you haven’t already done so, Claim your new System ID.
  2. Log in to your NDUS Account (User ID = firstname.lastname format).
  3. Click Change My Authentication Questions and Answers.
  4. Provide answers to at least three of the authentication questions.
  5. Click Save.

For password questions and help, contact the North Dakota University System (NDUS) Help Desk at 1-866-457-6387 or http://helpdesk.ndus.edu/.

Sometimes, when you have issues while logged in to Campus Connection, clearing your browser’s cache files (cookies, history, temporary internet files, etc.) will correct the problem. Many times, the North Dakota University System (NDUS) Help Desk will recommend this step first before troubleshooting the problem further. Please follow these steps for clearing your browser’s cache:

Note: These instructions are for the Internet Explorer browser. The included screen shots were taken using Internet Explorer 10. While the visual look may be different in Internet Explorer 11, the same steps can be used to clear the browser’s cache.

STEP 1:

  • Open the Internet Explorer browser.
  • Locate Tools in either the main menu (top of screen) or the command toolbar (at right).
  • Select Internet Options from the drop-down menu.

Clear Cache 1
 Sample view of browser window highlighting location of Tools menu item.

STEP 2:

  • In the Internet Options window, under the General tab, locate the Browsing History section and click Delete.
  • You also have the option to check the Delete browsing history on exit checkbox, which deletes selected files (see Step 3) every time Internet Explorer is closed.

Clear Cache 2
Sample view of Internet Options window with browsing history delete options highlighted.

STEP 3:

  • In the Delete Browsing History window, do the following:
    • Uncheck: Preserve Favorites website data
    • Check: Temporary Internet Files and website files
    • Check: Cookies and website data
    • Check: History
    • Check: Downloaded History
    • Check: Form Data (optional)
    • Check: Passwords (optional)
    • Check: ActiveX Filtering and Tracking Protection Data (optional)
  • Click Delete when finished selecting checkboxes.
  • A pop-up window will appear temporarily showing the progress of the delete process.

Even though the last three checkboxes are optional, it is recommended that you include these in the cache-clearing process to make sure that all files associated with Campus Connection are cleared from your browser.

Clear Cache 3

Sample view of Delete Browsing History window with the un-checked Preserve Favorites website data checkbox and Delete button highlighted.

STEP 4:

  • Close all Internet Explorer browser windows.
  • Relaunch Internet Explorer to begin using the refreshed cache settings.

  1. Log in to Campus Connection.
  2. From Student Center, click Finances then Direct Deposit Inquiry.

Note: Dropping a class may have an impact on your financial aid. Before dropping a class, please contact the Office of Financial Aid to see if the change in course credits will affect your financial aid award. Also, see the Dropping vs. Withdrawing page for information on refunds of tuition and fees.

  1. Log in to Campus Connection.
  2. Click Academics then Enroll.
  3. Click on the Drop tab.
  4. Select the checkbox for the class you wish to drop.
  5. Click Drop Selected Classes.
  6. Verify the course(s) you wish to drop and click Finish Dropping.
  7. Watch for Success or Error messages:
    • A green check mark means you’ve successfully dropped the course.
    • A red X means there was an error that stopped you from dropping the class.
  8. Click My Class Schedule to review your list of enrolled courses; print a copy if desired.

Note: Campus Connection does not allow you to drop all your classes (one class will always remain active). If you wish to cancel your registration (before the start of the term) or to withdraw from all your classes (after the start of the term), you must contact the Student Affairs Office at 1-800-279-4295.

To update your emergency contact information in Campus Connection:

  1. Log in to Campus Connection.
  2. In the left navigation menu, click Emergency Notification Update.
  3. Enter the phone number you can be reached most quickly at in an emergency.
    • Note: Students can only enter one contact number.
  4. Choose the campus(es) that you would like to receive notifications from.
  5. Click Submit Changes.

You will receive a confirmation page indicating your changes have been saved.

Navigation:  Faculty/Advisor Homepage > Faculty Center > Grade Roster

All faculty will see the ‘Request Grade Change’ button AFTER grades are posted.

Visual of the Grade Roster Page

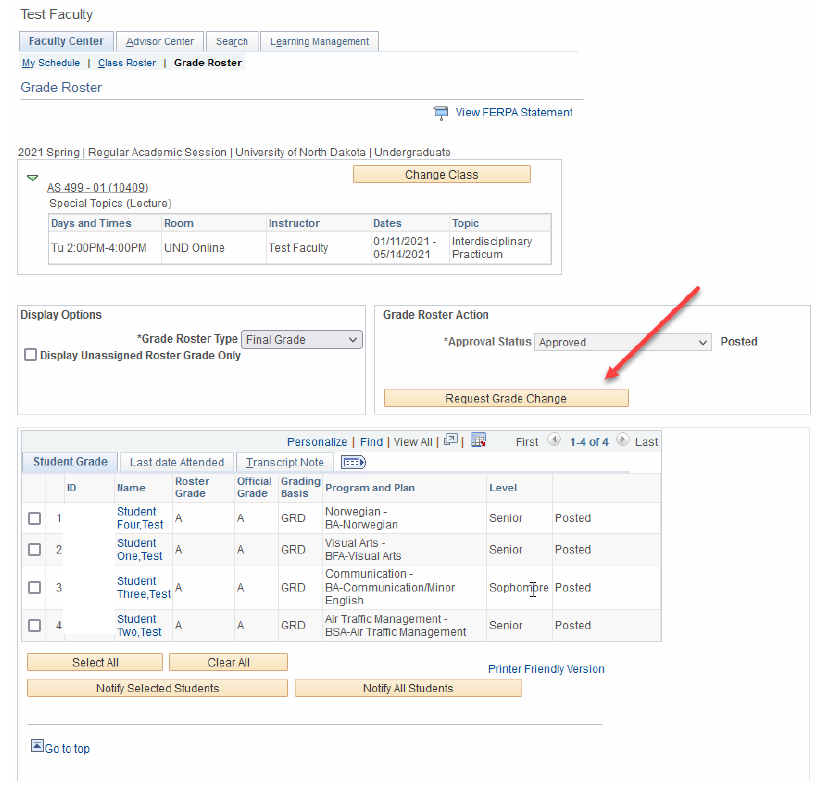
The ‘Reason’ field is always mandatory.

Visual of the Grade Change Request Page

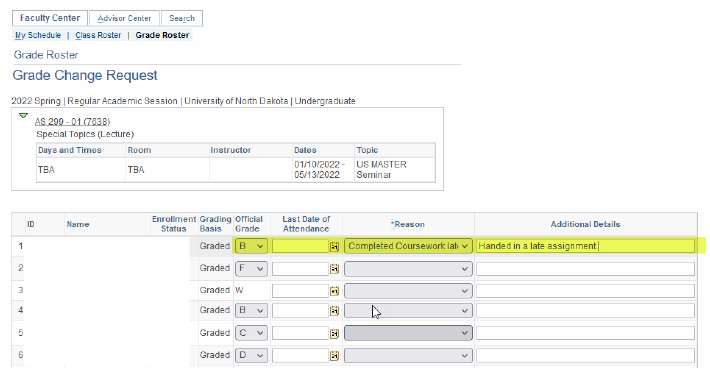
After clicking the ‘Submit’ button on the bottom of the page, the status will show ‘Success’ , the official grade was updated. Academic Records and Financial Aid will receive an email upon ‘Success’ of your submission.

  1. Log in to Campus Connection.
  2. From Student Center, click Self Service > Campus Finances > View Financial Aid.
  3. Click on the desired Aid Year to access:
    • Aid year totals
    • Aid totals per semester
  4. Click Financial Aid Summary for:
    • Financial Aid Budget
    • Estimated Family Contribution (EFC)

Reminders:

  • Review to ensure all awards are accepted.
  • If you decline an award, the amount will show as $0.
  • You can accept/decline your financial aid by clicking on Student Center > Finances > Accept/Decline Awards.

How to view mid-term grades (Students)

Click here for instructions on viewing your grades

How to enter mid-term grades (Faculty)

Click here for instructions on entering mid-term grades

How to view mid-term grades for advisees (Faculty/Staff)

To view mid-term grades for your advisees follow these instructions:

 Log in to Campus Connection

  1. Click 'Self Service' > 'Advisor Center' > 'My Advisees'
  2. Locate the student you want to check grades for
  3. Click the 'View Student Details' link
  4. Click the 'other academic...' drop down box, under the Academics section
  5. Click 'Grades'
  6. Click the go button
  7. Screen will default to Official Grades for the current term
  8. Click 'Mid-term Grades' tab to view mid-term grades
  9. Click 'change term' button to switch to a different term 

This prints the last eBill emailed to your DSU email address. If an eBill has not been sent to your @dickinsonstate.edu email address, it will not be available.

  1. Log in to Campus Connection.
  2. From Student Center, click Pay Online Now.
    *(Please wait while page loads.)
  3. Choose eBills from the menu at the top of the page.
  4. Right click on the page to print it.

Note: You can view past statements by choosing the appropriate date in the drop down menu and clicking Go.

For instructions on how to order official transcripts, please go to Academic Records' Transcripts page.

Unofficial transcripts can be viewed and printed from Campus Connection.

Note: Unofficial transcripts are only available online for students who were enrolled at DSU fall 2004 or later. If you were enrolled before fall 2004, please contact the Office of Academic Records at dsu.records@dickinsonstate.edu or 701-502-4389.

  1. Log in to Campus Connection.
  2. In the left navigation menu, click:
    • Self Service
    • then: Academic Records
    • then: View Unofficial Transcript
    • select Academic Institution
  3. Select from either:
    • Unoff PDF Transfer Details – (long form) displays detailed information about transferred courses
    • Unoff PDF Transfer Summary – (short form) displays only a summary of transferred credits
  4. Click View Report and wait for the report results to appear.
  5. Click View Report again to launch the PDF view of your transcript.
  6. Print if desired.

OR

  1. Log in to Campus Connection.
  2. From Student Center, click My Academics below the Academics section header.
  3. Click View My Unofficial Transcript.
  4. Select Academic Institution.
  5. Select from either:
    • Unoff PDF Transfer Details – (long form) displays detailed information about transferred courses
    • Unoff PDF Transfer Summary – (short form) displays only a summary of transferred credits
  6. Click View Report and wait for the report results to appear.
  7. Click View Report again to launch the PDF view of your transcript.
  8. Print if desired.

Note: The PDF transcript will appear in a pop-up tab/window of your browser. You may need to change your browser settings to temporarily allow pop-ups during your browser session when accessing your transcript.

Note: A transcript cannot be issued if a Customer Account Service Hold (account balance) has been placed on your account. Transcript orders that cannot be processed because of a Customer Account Service Hold will be cancelled after 30 days if the account has not been settled in full.

  1. Log in to Campus Connection.

  2. Click on the Profile tile.
    Student Profile
  3. Here you can click on the NavCollections on the left to update your:
    • Addresses
    • Names
    • Phone numbers
    • Email addresses, etc.

You are responsible for keeping your address and contact information updated with DSU. (The Legal name listed in Campus Connection is how your name will appear on your diploma, and the Home address will be used for almost all mailed correspondence.)

Legal Name Changes

If you wish to change your Legal name in Campus Connection, you must complete a Name Change Request Form and give official documentation to the Academic Records office in May Hall, Room 111. Drop it off in person or mail it to:

Dickinson State University
Academic Records Office
291 Campus Drive
Dickinson, ND 58601

  1. Log in to HRMS.
  2. Click Employee Self-Service.
    Employee Personal Details
  3. Click the Personal Details tile.
  4. Update your contact details in the Contact Details tab on the left.

  • Log in to Campus Connection.
  • From Student Center, click My Academics below the Academics section header.

Buster Advisement 1

  • Click on View my advisement report.

Buster Advisement 2

  • Different sections of the My Academic Requirements report can be collapsed and expanded by using either Collapse All or Expand All at the top of the report or by clicking on the triangle icons to the left of each information segment.
  • Courses will be marked with corresponding Taken, In Progress, and Planned icons throughout the report.

Buster Advisement 3

  • Log in to Campus Connection.
  • Your advisor’s name and phone number are in the information box on the lower right of your Student Center home screen (highlighted).
  • Click Details.
  • Click the advisor’s name to send him/her an email.

Note: In cases where Department Assigns appears instead of an advisor’s name, contact the school office of your major to obtain your advisor’s name and contact information.

Advisor 1

Not all holds prevent registering for classes; some service indicators are for information only. Check with the appropriate office for additional information.

  1. Log in to Campus Connection.
  2. Click details on the hold tab (on right of Student Center).
  3. View item list for holds.
  4. Click to receive more information.
  5. Follow instructions to resolve hold(s) prior to registration.

Possible holds include:

  • Admission – application materials are still required
  • Advisor – meeting with your advisor is required
  • Customer Accounts Services – your account has a balance that needs to be addressed
  • MMR Immunity Verification – proof of immunization is required
  • Registrar – contacting the Academic Affairs office is required

  • Log in to Campus Connection.
  • Click Enrollment > My Class Schedule.
  • If eligible for multiple terms/semesters, careers, and/or institutions, multiple options will appear. Select the appropriate option if applicable.
  • Select Filter Options to display classes (enrolled, dropped, and waitlisted classes).
  • Click Filter.

  • Click on Printer Friendly Page.
  • Select Print from browser menu.

Note: If you wish to display only those courses in which you are enrolled, make sure you have unchecked the Show Dropped Courses box.

  • You may also view your Weekly Schedule by going to: Enrollment > My Weekly Schedule.

A preferred name is the name you’d like to be called, especially if this name is different than your legal name. For example, this could be a nickname or a chosen name that best matches your gender self-identity. DSU students, faculty, and staff can set a preferred first name

Preferred names appear in many of DSU’s electronic systems including:
- Email display name
- Blackboard
- Class Roster/Grade Roster
- Advisement Report

To update your name in Campus Connection:

  1. Log in to Campus Connection.
  2. Click Profile in the main menu.
  3. Under Personal Details, click Your Name, then Type listed as Preferred Name.
  4. Update First Name and save.

Legal name changes must be done with the Name Change form.

You can update your gender, pronouns, and sexual orientation information in Campus Connection. These are opt-in options and are not required by DSU.

Gender identity is not shared with class instructors or other campus partners, including health services. Authorized campus employees with access to your bio-demographic information will also not have access to view your gender identity.

When you confirmed your enrollment to the campus, some of your personal information, like your name, ID number and demographic information, was made available to campus employees who work with you, including staff, faculty, and some student employees. If you decide to share your personal pronouns, your pronouns will be included along with other information provided to campus employees. Examples of where your personal pronouns will be available include the class roster provided to instructors and staff including your photo and the student record in campus systems that advisors and other student services staff use to work with you.

Sexual orientation is not shared with class instructors or other campus partners, including health services. Authorized campus employees with access to your bio-demographic information will also not have access to your sexual orientation.

For additional information and instructions for students, see these instructions on changing biographic fields. For additional information for faculty and staff regarding class roster view, see these instructions on adding pronouns to class rosters.